The Simple Point of Sale Your Business Actually Needs
No equipment to buy. No complicated setup. No overwhelming features. Just a simple, affordable POS system you can start using TODAY on your laptop or tablet.
Why Most POS Systems Don't Work for Small Businesses
High Upfront Costs
KES 50,000-150,000 in equipment before you even start. Tablets, printers, scanners you're forced to buy from them.
Equipment Lock-In
You can't use the laptop or tablet you already own. Switch systems? All that equipment becomes useless.
Overwhelming Complexity
Hundreds of features designed for enterprises. Your staff get confused, customers wait longer, and errors happen daily.
POS Built for Kenyan Small Businesses
Everything you need. Nothing overwhelming.
Any Laptop
Any Tablet
Any Printer
Anywhere
Works on your laptop or tablet - no special hardware
Compatible with ANY printer - thermal, inkjet, laser
Print receipts, invoices, or delivery notes
Cloud-based - access from anywhere
Automatic inventory tracking - Always know what you have
Simple Features That Actually Work
Lightning-Fast Checkout
Scan barcodes or search products instantly. Add to cart, process payment, print receipt. Done in seconds.
Smart Inventory
Every sale updates inventory automatically. Get alerts when running low. Never oversell or run out unexpectedly.
Multi-Device Ready
Switch between your laptop and tablet seamlessly. Your data syncs everywhere in real-time.
Flexible Receipts
Print professional receipts on ANY printer. Or send as PDF via WhatsApp or email.
Customer Management
Track customer purchases. Build loyalty. Know what your best customers buy.
Daily Reports
See exactly what you sold, when you sold it, and how much profit you made. All in 3 clicks.
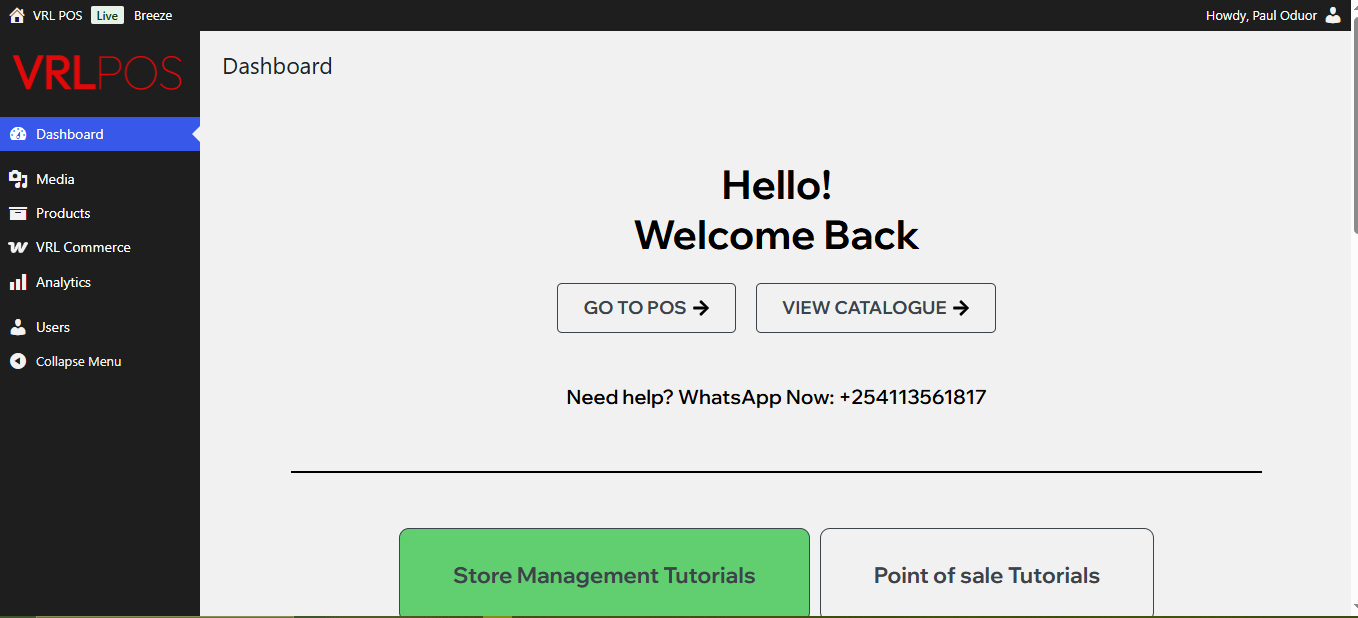
Your First Day with VRL POS
Login
This how your VRL POS store register will look like:
Login
First of all, you’ll have to log in.
When you visit the POS page, if you are not logged in, you will see a login screen like this.
Once you’ve added the correct login info, you will be able to pick the Store and Register you want to access.
Remember that Managers and Cashiers might have limited access to specific Stores and Registers, so on the login screen, they will only see those Stores and Registers they have been enabled to.
This will open the Register, which will make the Register session start.
If some other Manager or Cashier has already opened the selected Register, you will see a message that asks you whether you want to choose another Register or Take over. Only one Cashier at a time can be logged into the same Register, so, please, be careful and use the take-over function only if you know that you can freeze the other Cashier out of the Register.
Store Managers have access to the point of sale backend, so they will be able to log in from the dashboard when they click on the GO TO POS.
Logout
To log out of the Register, you can simply click on the Logout button that’s on the top right corner of your screen.
Please note that this button lets you log out of the point of sale and Register, but it will not close the Register. We’ll get to closing the Register and getting a closure report shortly.
User menus
Right side menu
This is the screen that Managers and Cashiers will see.
On the top right of the screen, you will see:
a bell icon that lets the Cashier turn off the Register sound effect.
a full-screen icon that will let the Cashier see the POS view in full screen (available only on the desktop version)
the name of the logged-in user. If you hover over it, you will be able to see a quick recap with the following information:
Login time: this is the date and time of the cashier’s login.
Orders: this is the number of orders placed since the cashier’s login.
Products: this is the number of products sold by the cashier since the login.
Total sales: this is the total amount of sales made since the cashier’s login.
You can also download a complete CSV report about the cashier and the current session (we’ll get to this later).
The red Log out button will let you quit the Register and log out of the website. Yet, this will not close the Register.
Left side menu
On the left side of your screen, instead, you will see:
The Store and the Register you’re logged in
The Manage Store button to log into the backend of your point of sale (only available for Store Managers)
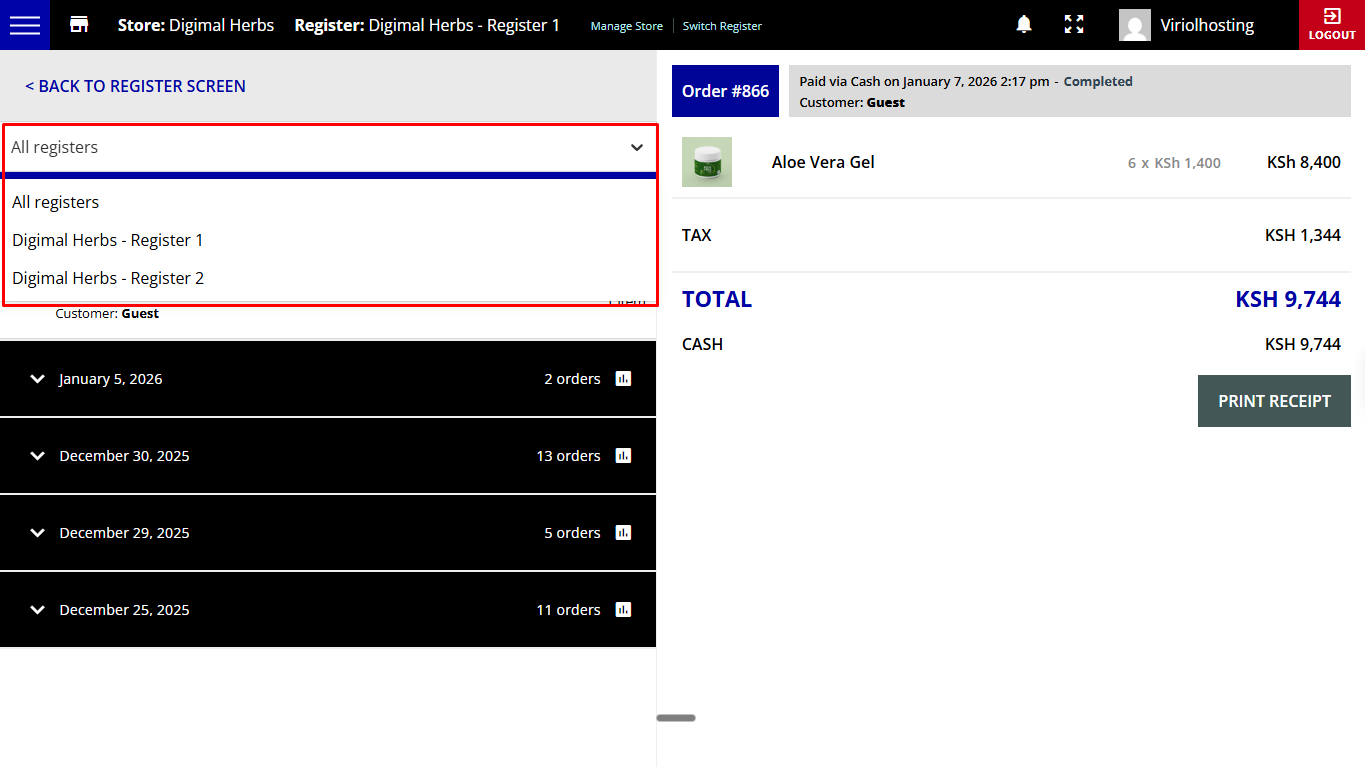
The Switch Register button to switch from a Store/Register to another one (only available for Store Managers)
A menu button that opens the following views:
Register screen
Order history
Today’s profit
Manage cash
Close Register
Let’s see them one by one in the posts below.
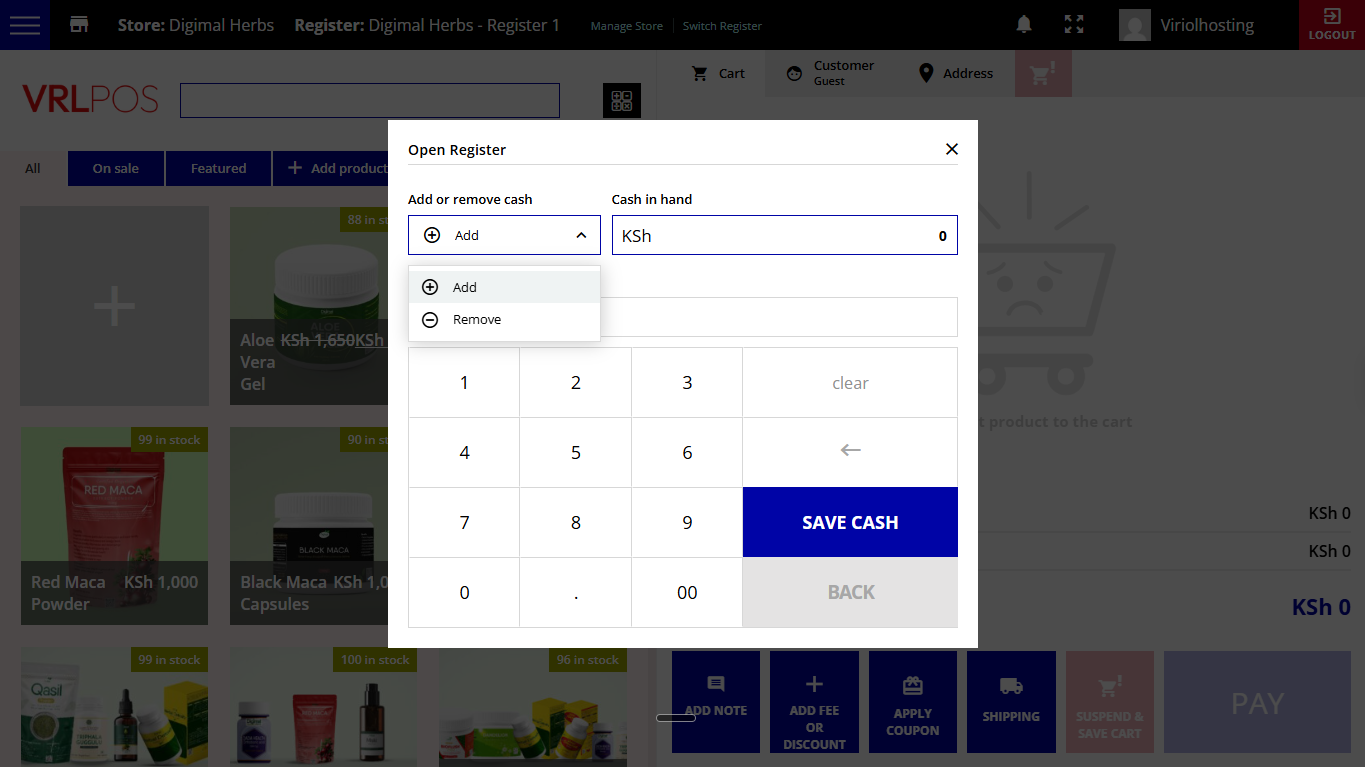
Open Register – Cash in hand
This is the main screen. Whenever you open a Register, a window will open where you can add the Cash in hand amount.
You will be able to add more cash in hand during the Register session. Close the window if no cash is being added to the cash register.
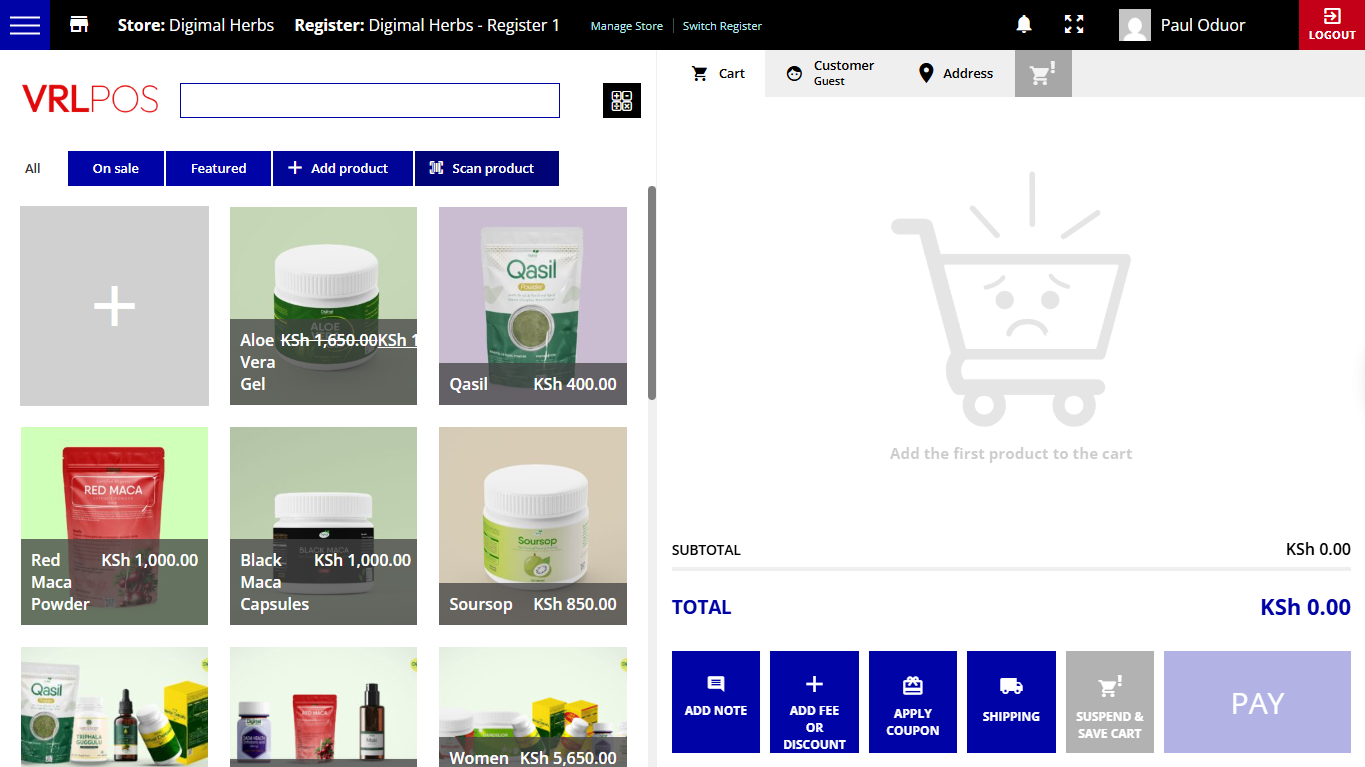
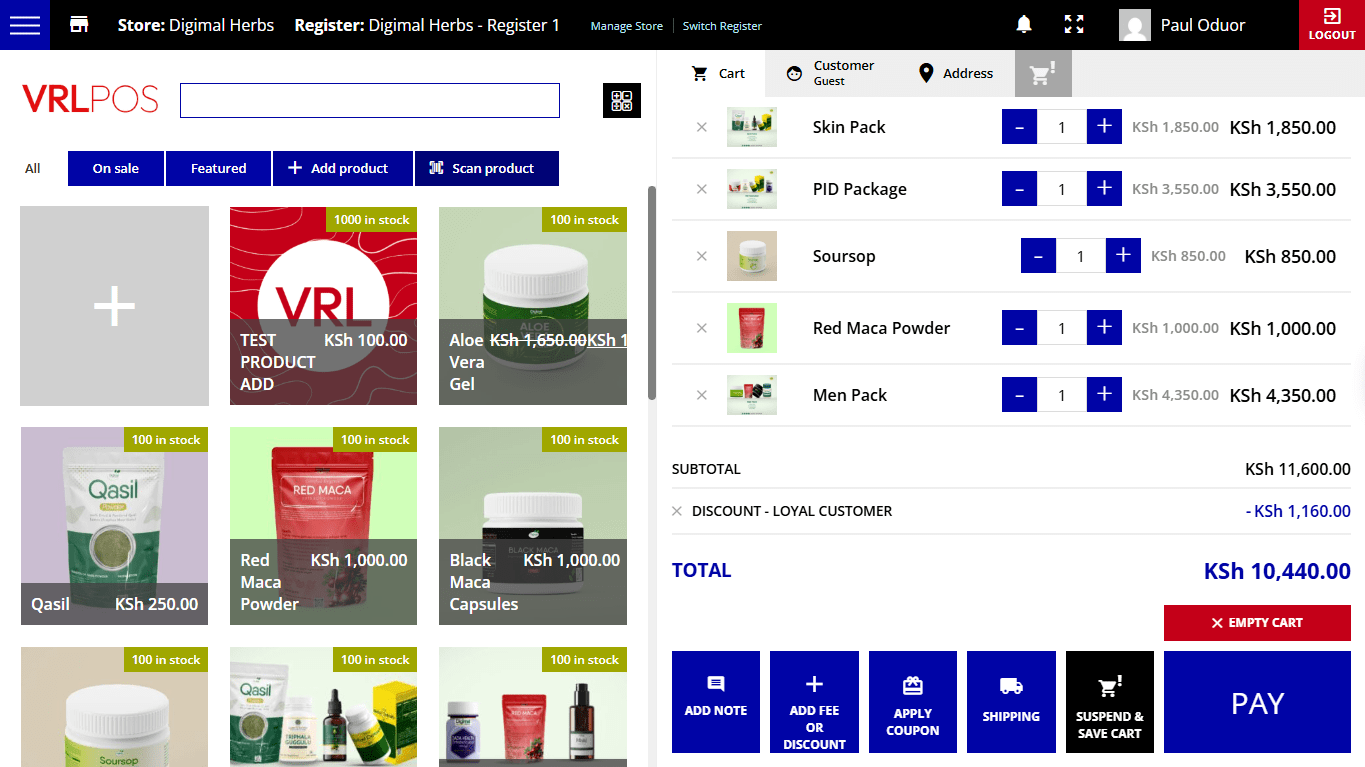
Products
Product listing: search, add and scan by barcode
On the left side of the screen, you will see all the products and be able to filter them by On sale, or Featured.
Just click on them to add them to the cart. If it’s a variable product, you will be able to pick the right variation:
Clicking on one product more than once will update the product quantity.
You can also search products by name in the search bar or by Barcode if the related option has been enabled.
To scan a product by barcode, you just have to select the Scan Barcode tab and the pointer will be automatically placed in the search bar. Just scan the item with your barcode reader, and you will find the product matching the code.
Barcodes are automatically generated by the point of sale system for every product and order in your shop. Note that the barcode readers work like any other input device; alternatively, you can manually enter the barcode from your keyboard.
Add a new product on the fly
Finally, from this section, you can also add a product on the fly by clicking on the Add product tab.
You will be able to fill in the following information for the new product:
Product name
Product category: start typing to search among your shop categories
SKU: enter the product SKU here.
Tax Status: you can pick one among:
taxable
shipping only
none
Tax Class: you can pick one among what you’ve set up in your Tax settings.
Regular price: enter here the product price.
Stock(only available for Store Managers): enable or disable the stock management for this product here.
Quantity in stock(only available for Store Managers): enter the total stock quantity here.
Sync with VRL Commerce(only available for Store Managers): choose whether to sync the product that you are now creating with your VRL Commerce products. If disabled the product will not be saved. If enabled, the product will be saved in VRL Commerce > Products (with the visibility option set to Hidden). This means that, by default, the product is hidden in the online catalog and is visible in POS only.
Please note – products added by Cashiers will only be available on that specific order and will be deleted immediately after the order is completed.
After clicking on ‘Create product’ the product will be automatically added to the cart.
Calculator
Next to the product search bar, you will also be able to see a calculator for quick calculations you might need to do when the Register is open.
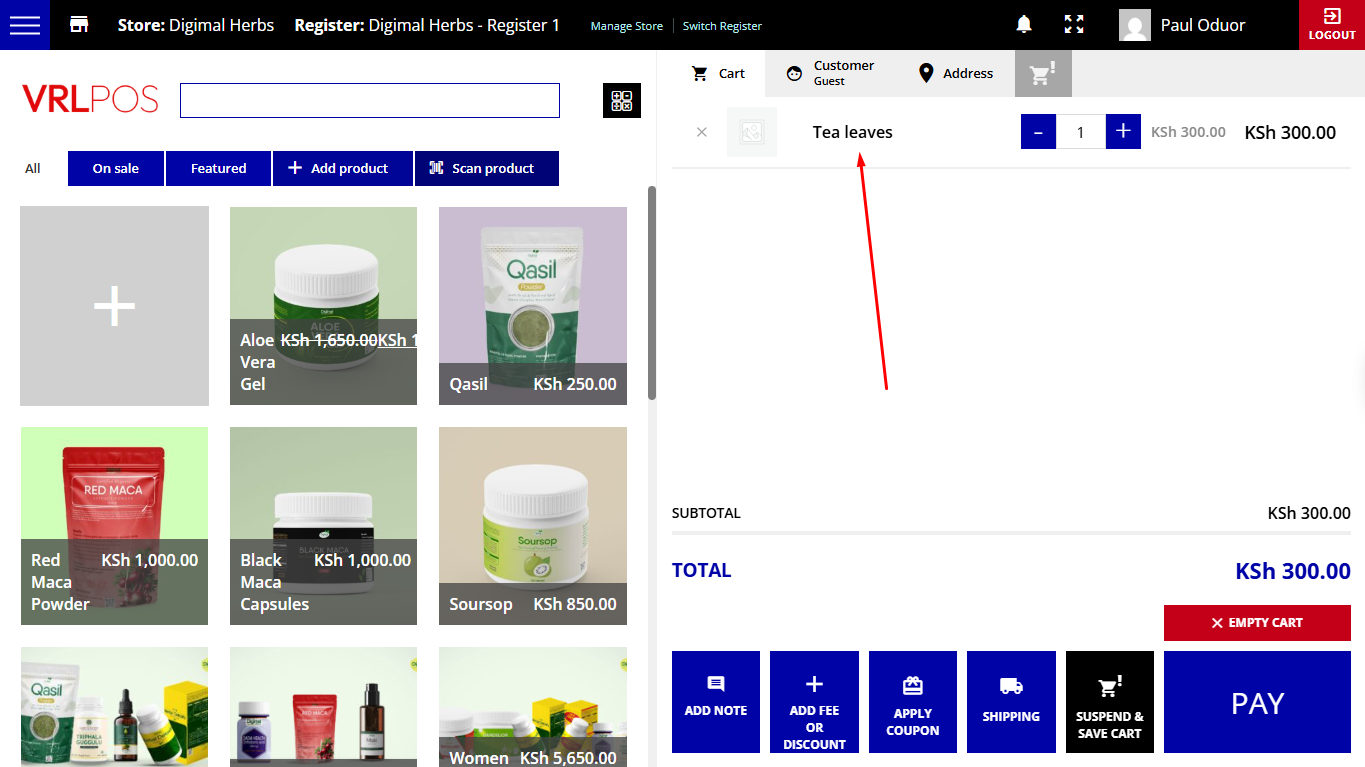
Cart and payment
On the right side of the screen, you will see the Cart with all its options.
Whenever you click on a product from the left or scan its barcode, you’ll see it appear in the Cart.
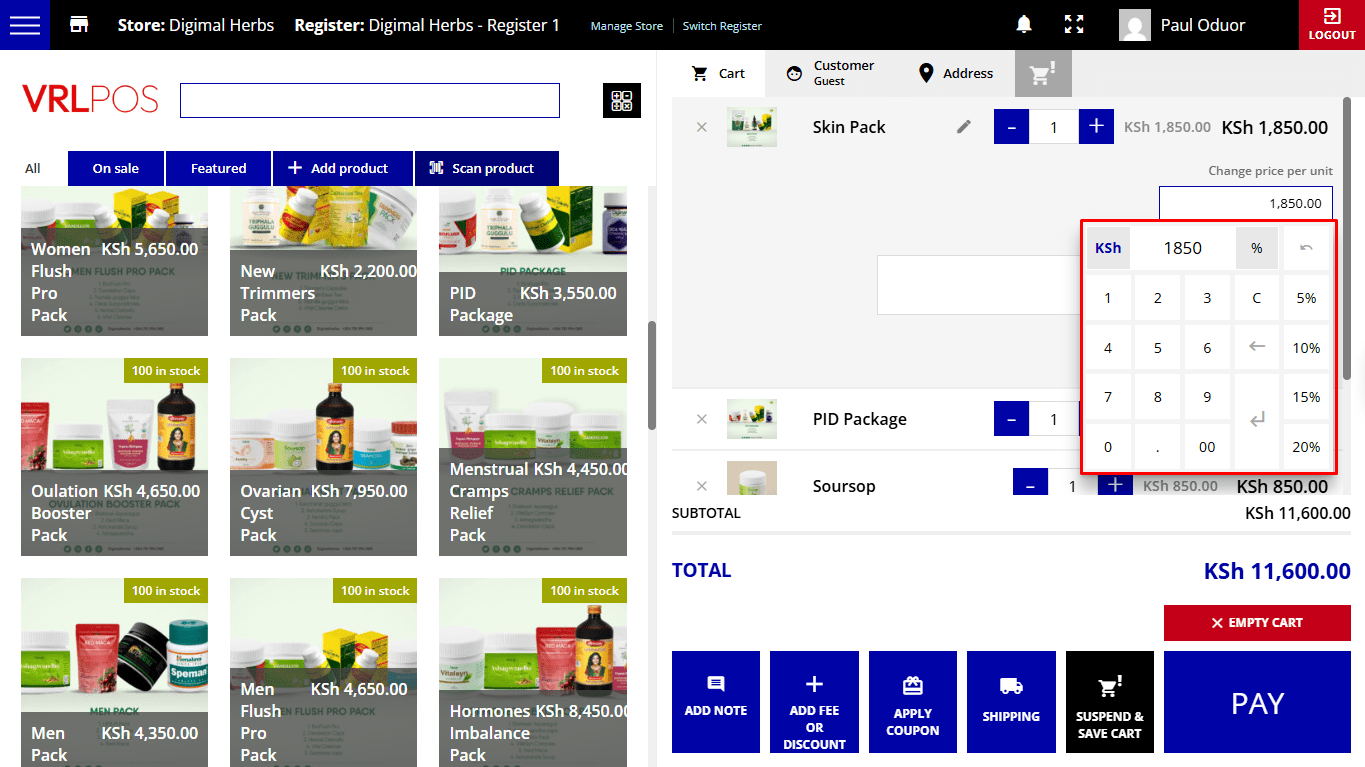
Every time you click on the product, the quantity in the cart will be updated. Yet, you can also edit more information on a product basis, once the product has been added to the cart.
If you hover over the product in the cart, you will see a pencil icon: click on it to open more details.
You will be able to edit the unit price. Click on the price to open the Number keyboard and apply either a fixed price (click on the KSh symbol) or a percent discount (click on the % symbol) on the unit price.
You can also add a note on the product. You will see an icon on the product when the product box is closed.
Cart buttons
At the bottom of this screen, you will also see more buttons.
1. Add note
This allows you to add a note to the entire order.
2. Add fee or discount
This allows you to add either a fee or a discount on the order total. You can either choose fee or discount and select whether it has to be fixed or percent. You can take advantage of the preset keys for a quick selection (Popular fees). Additionally, you can add a Reason text to take note of why the fee/discount has been applied.
When applying a discount, this will be automatically converted into a coupon that will be added to the order details, like in the image below.
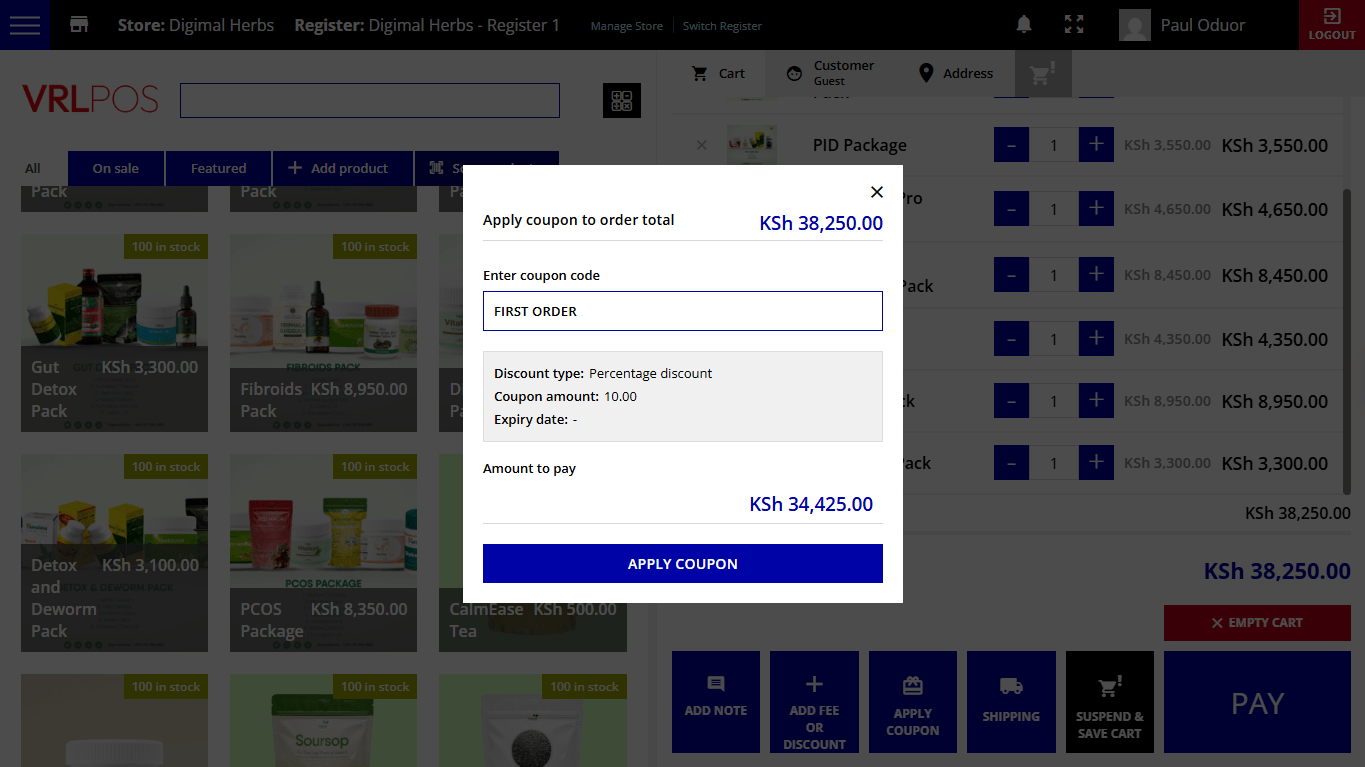
3. Apply coupon
Click on this button to apply a coupon code that has been previously created in VRL Commerce > Coupons. Copy and paste the code and click on ‘Apply coupon’ to confirm.
4. Shipping
Click here to add a shipping cost. Select the shipping method first and then type in an amount that will be added to the cart total.
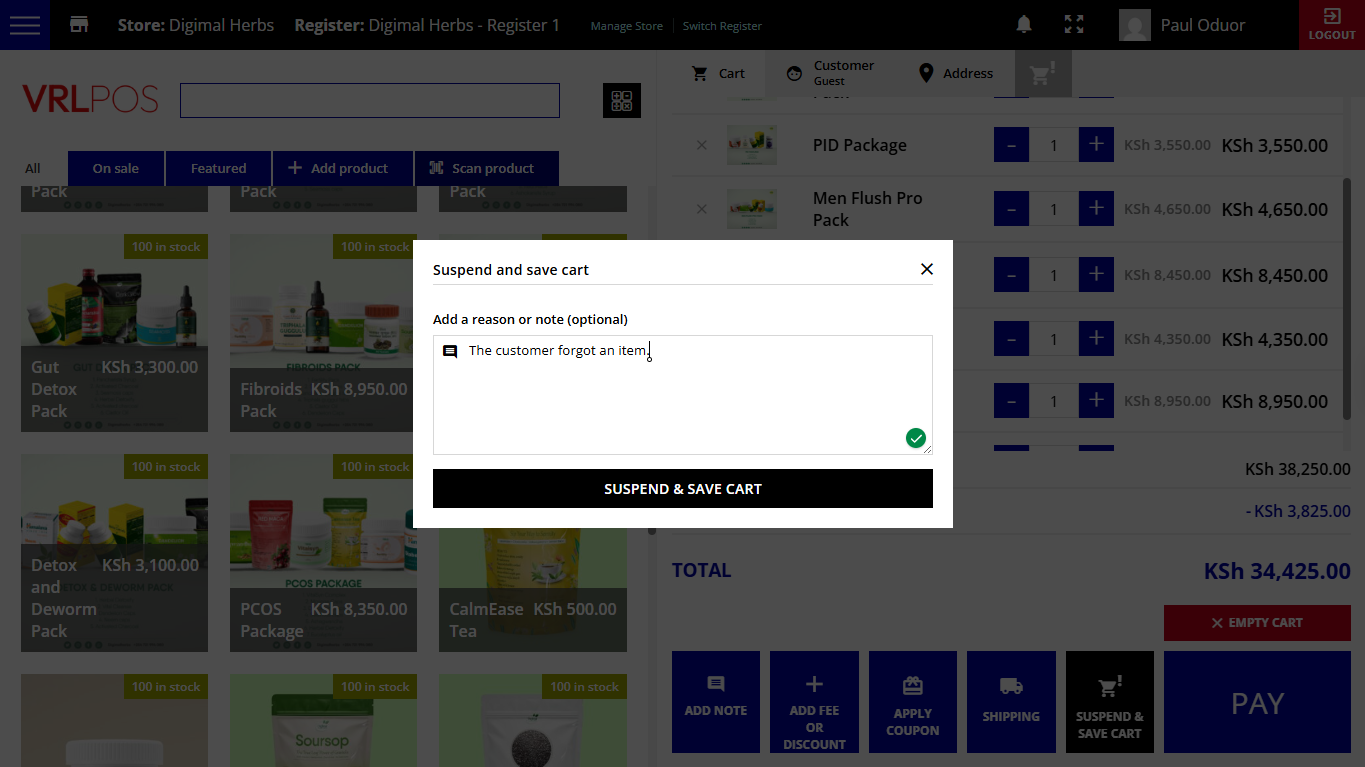
5. Suspend and save cart
Click this button if you want to freeze the cart for a while and start over with a new one. This option may turn out to be very handy if the customer has forgotten a product, or if you have to quickly update something on the website’s backend. You can add a note to it, so it’ll be easier to find it back.
After saving the cart, you can start with a new order.
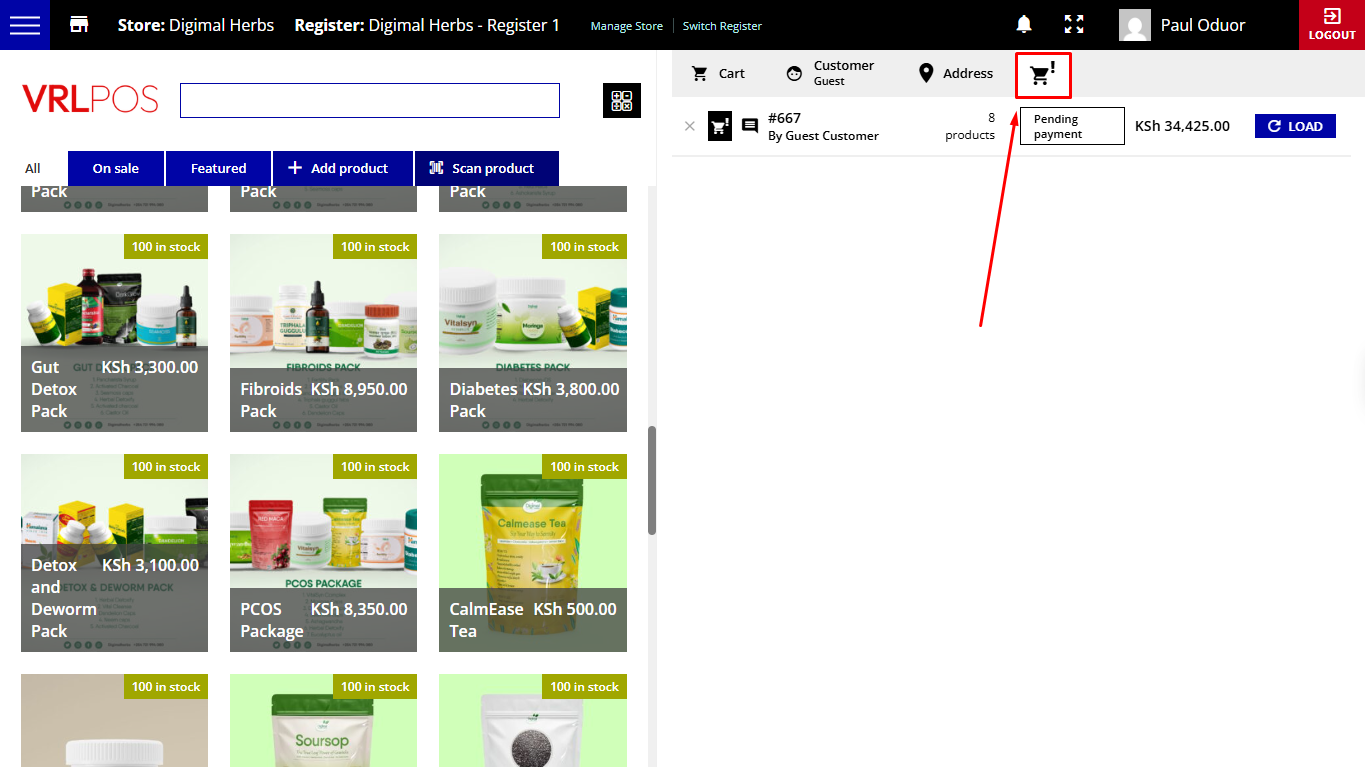
Whenever you’re ready to retrieve one of the saved orders, click on the Cart icon button that you find on top of the cart, select the cart that you want to restore, and click on Load. You’ll be able to proceed and complete the order.
6. Empty Cart
You can also empty the cart in one move, and start adding products again.
7. Pay
When everything is set, you can click on the Pay button which will open a popup window with all available payment options.
In this window you will see on the left:
Total due: this is the total amount that the customer has to pay.
Total paying: this is the total amount that the customer is actually paying. It includes amounts from all the payment methods selected.
Balance: this is how much is still left to pay.
Change: this is the change that the cashier has to give to the customer.
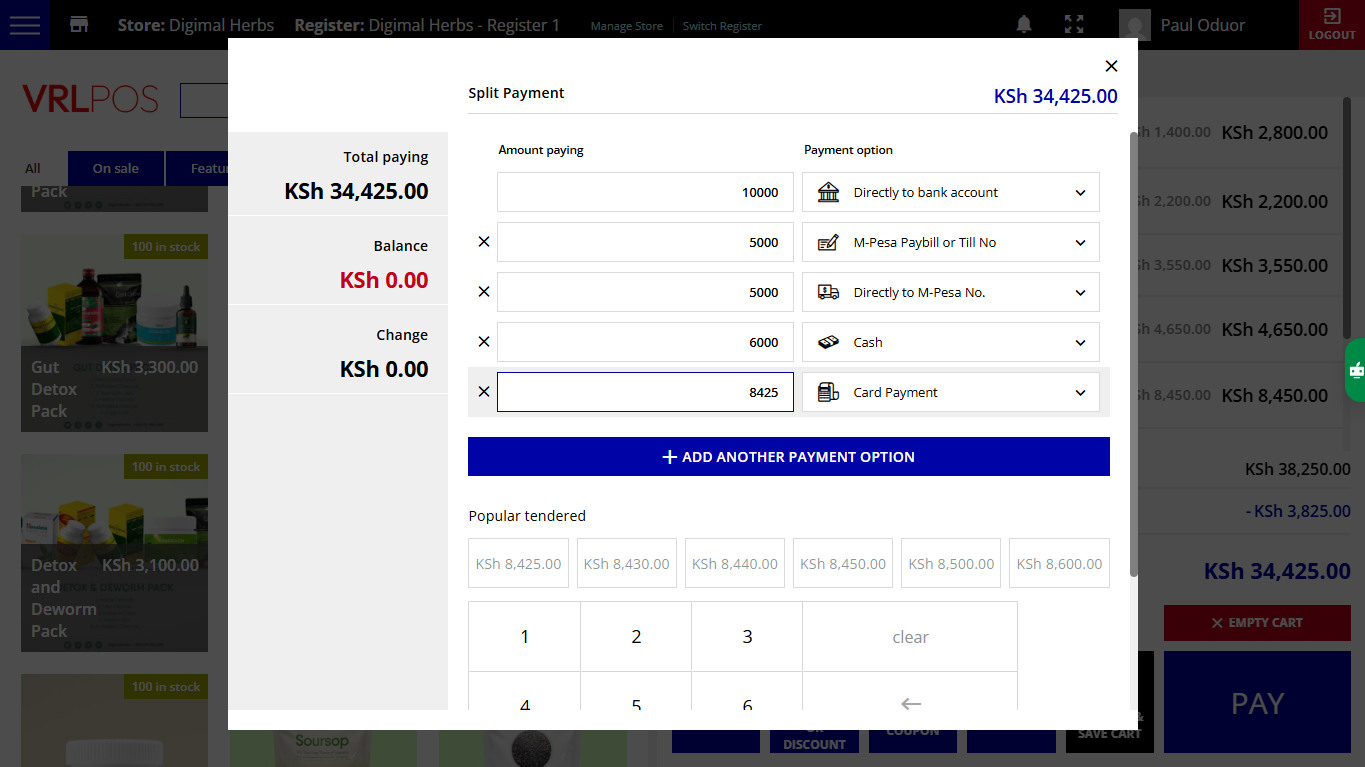
You can also split the payment and let customers pay the same order with more than one payment method:
Amount paying: enter here the amount that the customer is actually paying by each specific payment method.
Payment option: select here the payment method used.
Add another payment method: click here to add another payment method and fill in the Amount paying and payment option.
Popular tendered: here you will find preset amounts that are smartly calculated. The first available one is the balance due, whereas the other ones are the nearest amounts calculated depending on the currency denominations. You can either select one of them or type the amount from the Number keyboard.
Finally, click on Pay and an order will be created with Completed status. If you add also Shipping information, the order will be created with Processing status.
This is what the admin will see on the backend in the order details:
As you can see, you will find a metabox on the right side called POS info, which includes the Store name, the Register, the Cashier, and the payment methods with the related amount paid.
How does the payment work?
All payments have to be processed manually. So, when you place an order, you’ll have to select the payment method, click on Pay, and process the payment separately.
Orders will be automatically set to Completed, so, please, make sure you only click on the Pay button after receiving the payment.
Only in one case the order status goes to Processing and this is if there are one or more shipping lines in the order, which means that the order has to be shipped.
For example, before going to payment, you can add one or more Shipping methods/fees, to make sure that the order will be shipped.
This will create shipping lines and the order will be set as Processing.
In that case, after the shipping, the order can be manually set to Completed from the backend, in VRL Commerce > Orders after quickly filtering orders from the dropdown menu and clicking on VRL POS.
Customer
When you place an order from the POS screen, you can either process the order for guest users, or you can associate an existing or a new user to it. This can be useful if you need to save customers’ details like the billing and shipping information (for example for home delivery) or if you have special coupons for returning customers only and so on.
Let’s see how to do that at the cash desk.
At any time, you can open the Customer tab that’s on the right side of your Register screen.
In the popup, will be able to choose from three different options:
Proceed as guest: click on this option to continue creating the order as a guest.
Load a customer profile: click on this option to create the order for an existing user; start typing the customer’s username or email address to select the user.
After loading the customer, you will be able to edit the user info, remove the selected user and decide whether to use that profile to complete the order, create a new user profile or proceed as a guest.
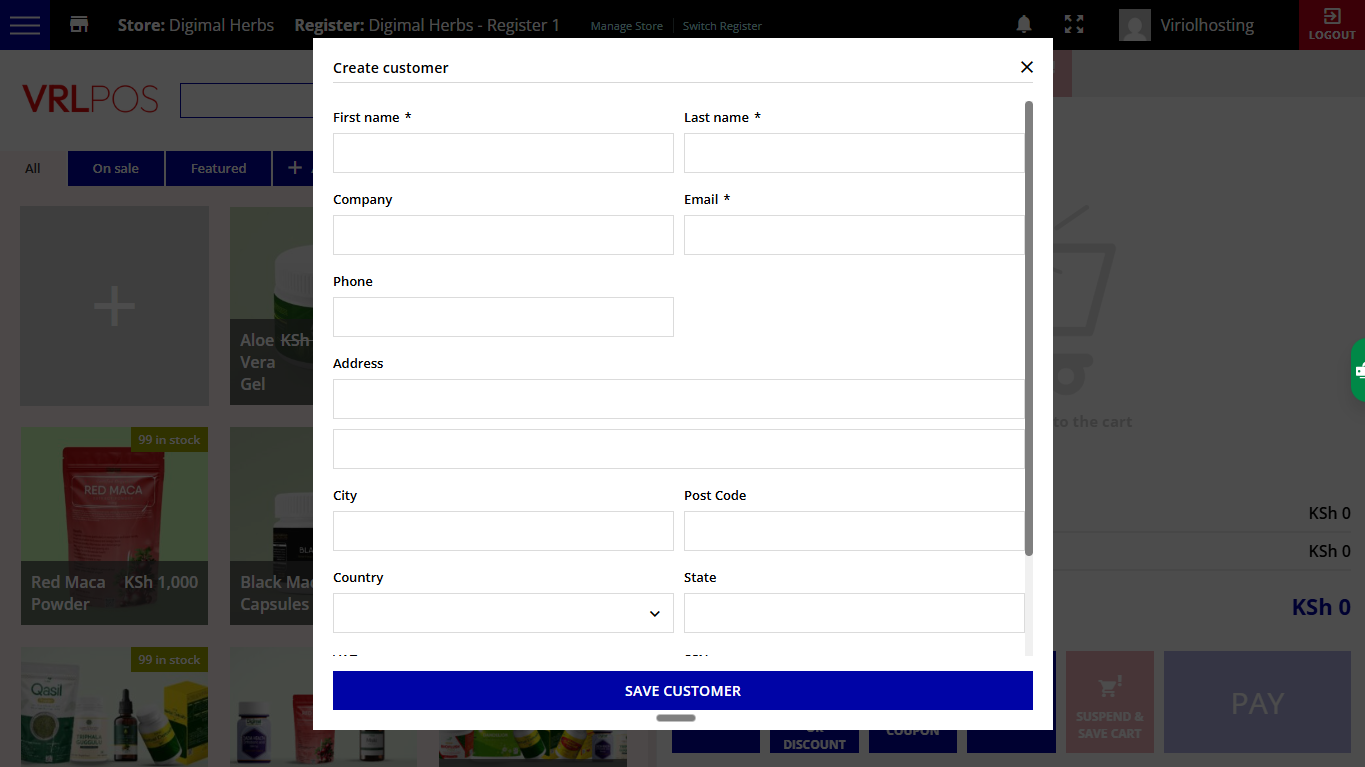
Create new customer profile: click on this option to create the order for a new customer; complete the fields to create the profile with the customer billing details.
Before saving the customer and completing the order, you’ll find the option to use the same billing info for the shipping.
The new user will be then available in the Users tab on the backend, as well as their billing details.
These are all the available fields for new and existing customers:
First name * (required field)
Last name * (required field)
Company
VAT / CIF / ID
Email * (required field)
Phone
Address
City
Post Code
Country
State
Please, make sure you fill out at least all required fields (First name, Last name and Email), otherwise, you will not be able to complete the order.
Address
For guest users, you can set up the customer’s shipping address before proceeding with the payment. To do that, just open the Address tab on the right side of your Register screen and fill out the fields.
You will find these shipping fields:
First name * (required field)
Last name * (required field)
Phone
Address
City
Post Code
Country
State
Please, make sure you fill out at least all required fields (First and Last name), otherwise, you will not be able to complete the order.
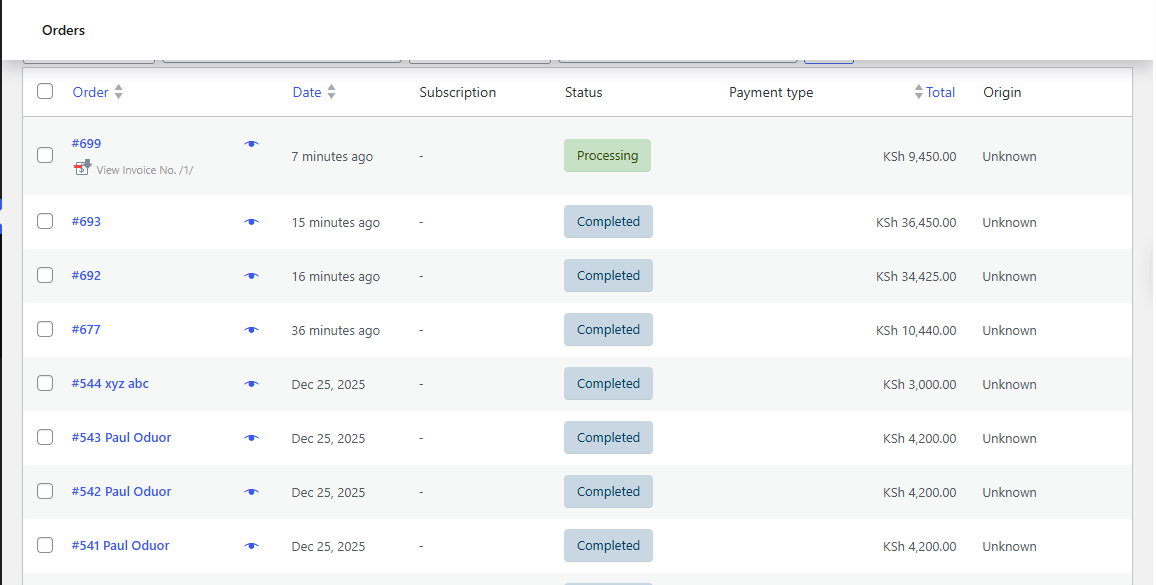
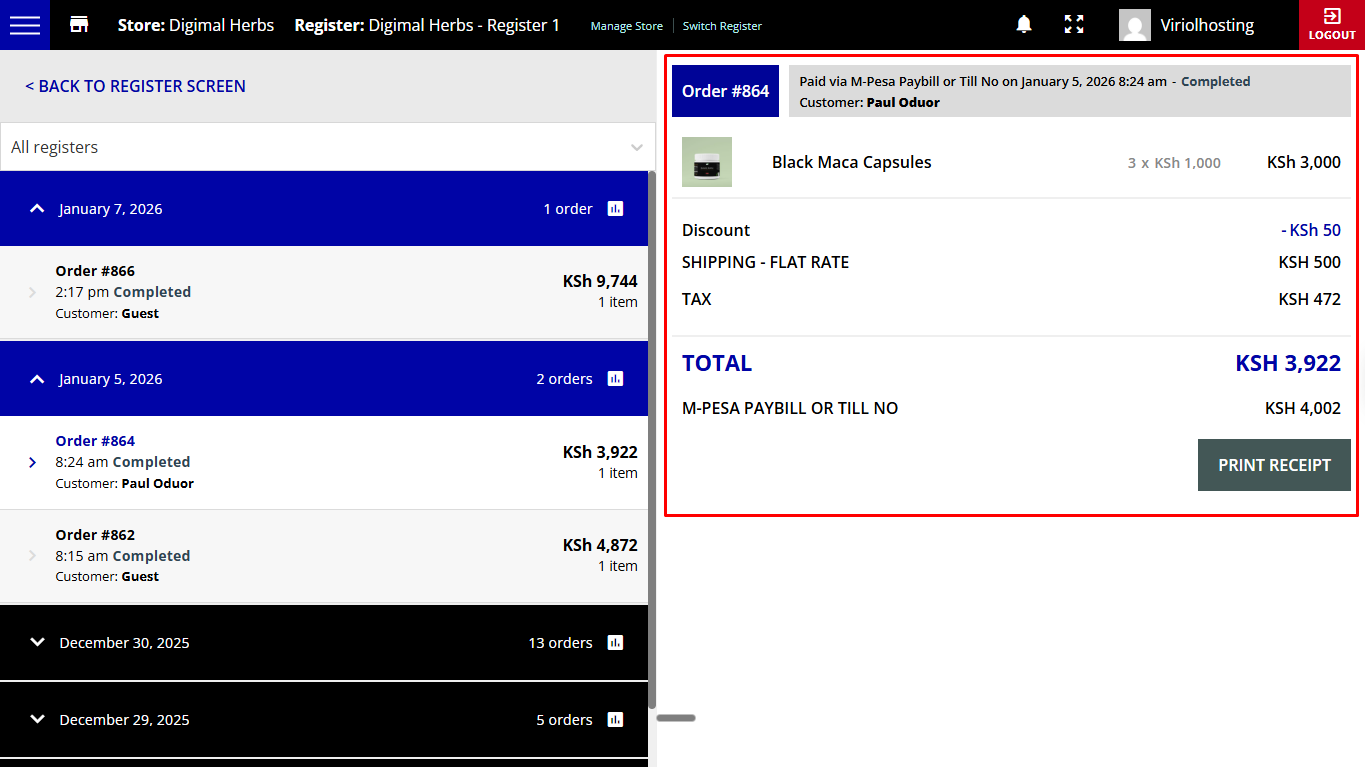
Order History
In the Order history, you will be able to find a list of all orders placed in the current store through the POS system.
Go to the left menu on top of the screen and click on Order History.
You will see a list of all orders grouped by day from the most recent to the oldest ones.
You can also filter orders by Register by simply selecting it from the dropdown menu on the left.
Click on a specific day, then on the order to see the details on the right side of the screen.
Here you can see:
Order number
Payment method
Order date and time
Order status
Customer
Products and quantity
Tax and fees
Receipt: you can print the receipt once again from this screen
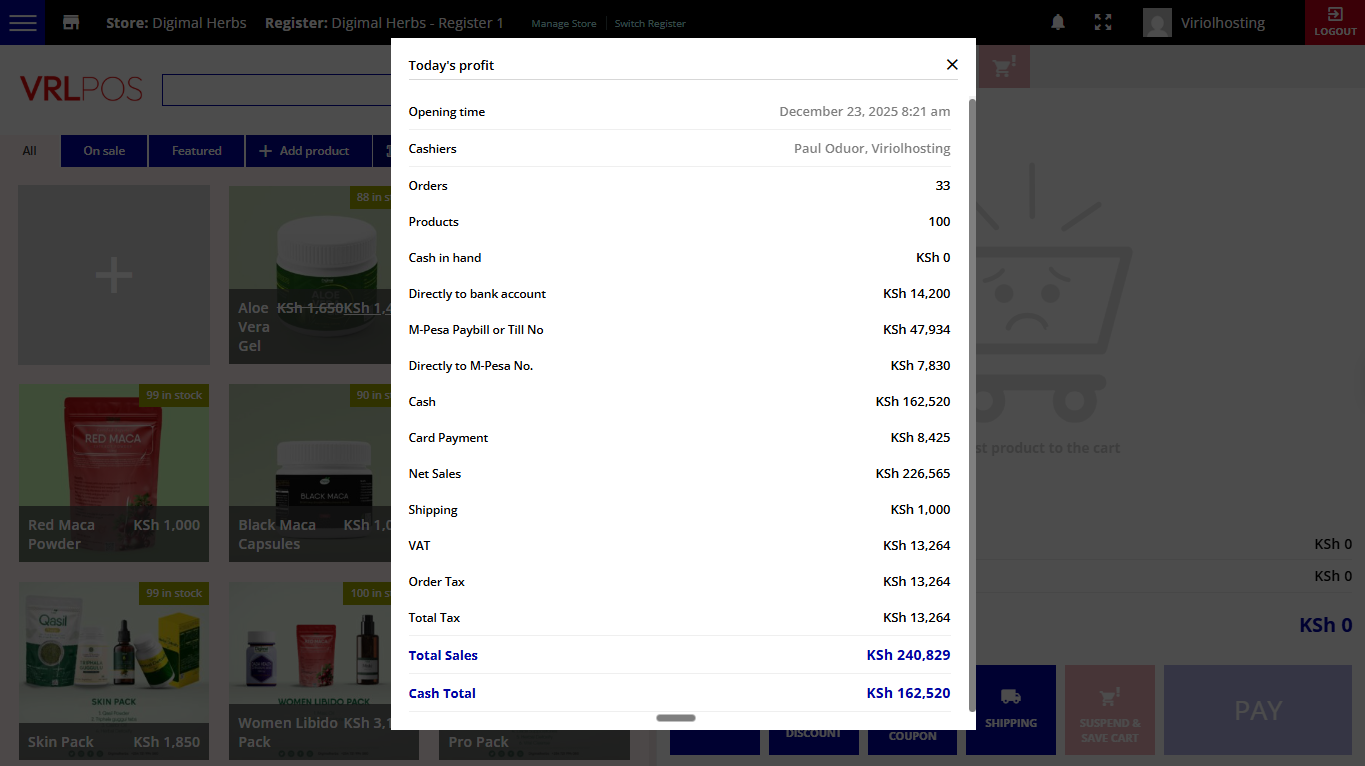
Today’s profit
Select Today’s profit from the menu on the left, and you will be able to see a recap of all sales made since the Register opening.
You will find the following information:
Opening time
Cashiers logged in during the session
Total number of orders
Total number of products sold
Cash in hand
Sales by payment methods
Net Sales
Shipping
VAT
VAT shipping
Order tax
Shipping tax
Total tax
Total sales
Cash Total in the register
Manage Cash
At any time during the Register session, you may need to add or remove Cash from the register and save this information. To do that, just go to the menu on the right side of your screen and select Manage Cash.
You can either select Add or Remove, enter the amount and add a Reason to add a note about why cash has been added or removed.
Close Register
The Register closure is a very important step. When it’s time to close the Register at the end of the day, you can go to the menu on the left side of your screen and select Close Register.
This will print a summary with all the following details:
Opening date and time
Closing date and time
Cashiers logged in during the session
Total number of orders
Total number of products sold
Total Cash in hand
Sales by payment method
Net Sales
Shipping
VAT
VAT shipping
Order tax
Shipping tax
Total tax
Total sales
Cash Total in the register
Add a note field
CSV Closure Report download
Always make sure you close the Register before logging out, otherwise, the register will remain open.
You process M-Pesa on your phone as usual, then mark the payment in VRL POS. It tracks M-Pesa, cash, and card payments in your reports so you know exactly where your money is coming from.
What if I'm not tech-savvy?
If you can use WhatsApp, you can use VRL POS. Step-by-step video training is included. Our support team responds within 5 minutes if you need help.
What equipment do I need?
Just a laptop or tablet and any printer. That’s it. Use the devices you already have – no special equipment required.
Can I add more registers later?
Yes! Just log in on another device. No additional equipment to buy. Perfect for growing businesses or multiple locations.
Is my data safe?
Yes. Automatic cloud backups are included. You own your data and can export it anytime. We use industry-standard security.
What if I need help after setup?
Priority email support is included for 90 days. You also get full access to training videos, documentation, and our knowledge base forever.
Can I try it before committing long-term?
Absolutely. Start with the monthly plan (KES 1,500) and upgrade anytime. Plus, we offer a 90-day satisfaction guarantee on all plans.